This bread experiment is inspired by my new favorite cooking website: Hilah Cooking. Last month Hilah Johnson posted a video with a new way to make bread that she had learned from a 2006 article posted on the New York Times Online. The article is about minimalist bread making and goes into quite a lot of detail in regards to the science behind this method; to boil it all down, instead of kneading the dough time does all the work.
Hilah's recipe and video can be found here and since she uses regular wheat flour, I had to wonder if it would work with gluten-free flour. Creating the perfect loaf of gluten-free flour is one of my main cooking quests, and a lot of other people have asked Hilah if it will work with gluten-free flour; I'm doing a good thing for everyone!

So that's the experiment! Will update with each step:
Step One:

May 7th 9:20 PM
In a large mixing bowl: Mix 1 pkg Pamela's Gluten Free Bread Mix (19 oz bag, 1 loaf) with a heaping 1/4 teaspoon of yeast (included in the bread mix), 1-1/2 tsp salt and 2-1/4 cups warm water in a mixing bowl. Cover loosely with plastic wrap and a damp kitchen towel and set aside.
Step Two:
May 8th 3:20 PM
After a lovely time at the eye doctor's getting fitted for new glasses, we got home just in time for step two of the bread experiment. The only catch? My eyes are completely dilated, so getting nice clear photos was a bit tricky. Also, I punched the dough a bit too hard and hit my knuckles against the bottom of the glass mixing bowl. Ouch!

Here's what you do and this is where not having gluten in the flour really shows up:
- Uncover dough; it should have risen quite a lot and if you used plastic wrap, there should be condensation inside...it's a very moist and sticky dough. Next - PUNCH IT! But wait, be gentle, because this dough is softer than gluten dough, so there's very little resistance to your mighty fist and slamming your fist into a glass bowl is a pretty good way to hurt yourself.
 Sprinkle flour on a clean surface, like a counter-top or cutting board; turn dough out onto the floured surface, sprinkle liberally with more flour, then as best as you can, fold it over onto itself at least twice. The dough will be EXTREMELY STICKY, so don't be surprised if your hand ends up being covered in dough.
- Sprinkle corn meal onto a clean plate or other shallow dish (maybe do this before you get covered in dough) and transfer dough onto the cornmeal. I ended up doing this twice because I changed my mind about which dish to use for step four, so my dough has cornmeal on both sides. Shape as best as you can.

- Cover with plastic wrap and towel again and let it rest for two and a half hours.


At this point my expectations are not very high, but I'm still hopeful. Even recipes designed for gluten-free flours end up with dough that really doesn't look like what we think of when we think "bread", so there's a chance that the process will still work despite the ugly dough situation.
Step Three
May 8th 6:30 PM

Two and a half hours later (or there abouts) the dough should be nicely risen. Following the original recipe, I preheated the oven to 450 degrees, placing the only round lidded oven-safe baking dish I have (I really really NEED a cast iron dutch oven) inside to heat up. When the oven was fully heated, I removed the baking dish and put the dough inside it, covered it with the lid and then put it back in the oven to cook for 30 minutes. It's this stage that makes the crust so deliciously crackly, thanks to the steaming action that's occurring within the lidded dish.

At 30 minutes, the lid came off and baked for another 15 minutes. Since this was my first attempt, I tried to follow the instructions are closely as possible, but supposedly you can make a pretty wide range of adjustments and still get a perfect loaf of bread every time.
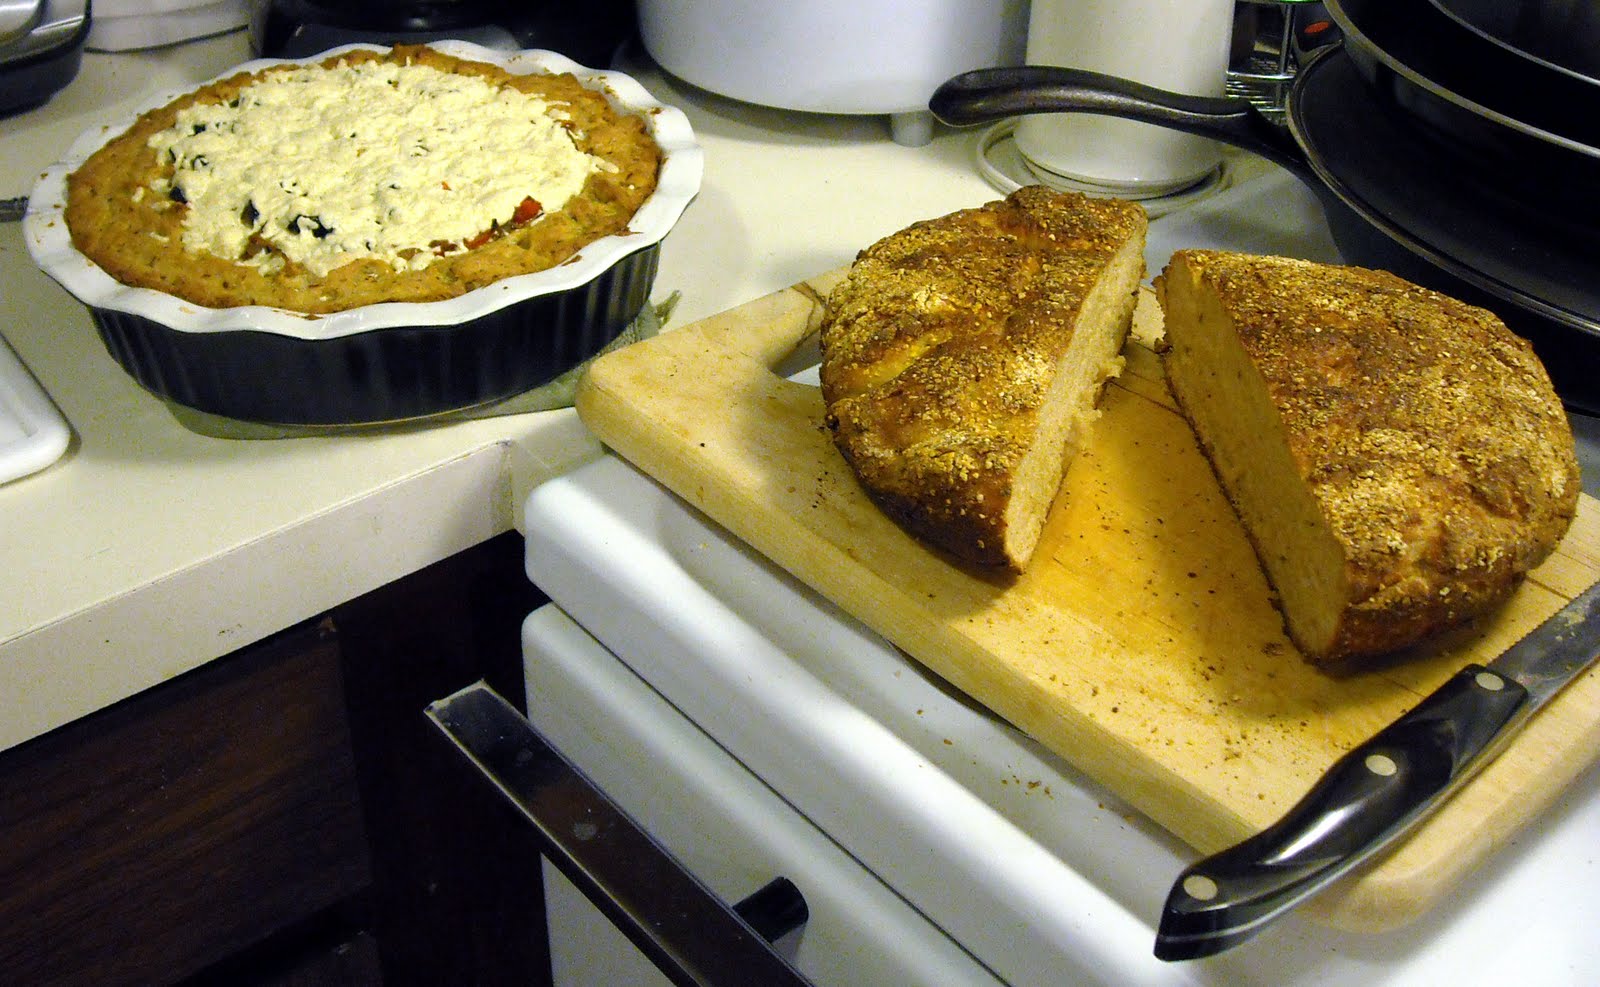
After the forty-five minutes of cooking, out of the oven it came and I promptly turned the entire dish over onto a cutting board to release the bread and...

IT STUCK! It took Garen coming in and using the flexible spatula (he has more height and better leverage for such things) to pry the bread loose. Finally we got it out and it was VERY pretty looking. Nice crackly looking crust, great smell, and it looked quite done.
As with most baked goods, a cooling time is required before cutting, so I let it sit for 15 minutes on the wooden cutting board and then cut it in half; unfortunately it was still a little
sticky in the middle near the bottom. Next time I think I will lower the cooking temperature to 400 and bake it for 45 minutes covered and 15 minutes uncovered to see if that works better.

Garen and I shared a slice out of the middle and despite the sticky part it tasted great! One thing I would love to find is a lidded cast iron loaf pan, since the main reason I make gluten-free bread is to be able to make myself sandwiches during the week for lunch and a round loaf is a bit harder to slice up right for that use.

In summary: Yes, this recipe DOES work for gluten-free flour and the fact that there's zero kneading involved is a huge plus. The dish you cook the bread in really does make the most difference, so choose something heavy with a tight fitting lid. Try cooking the gluten-free version longer on a lower temperature; the gluten-free dough is almost always going to be more dense to start with. If you're not entirely sure that the dough will release easily, a bit of cooking spray or oil should help prevent serious sticking; otherwise use a flexible metal spatula to pry it loose.
Tonight I also made a wonderful gluten-free pizza using Daiya vegan cheese and that recipe will be coming soon! Here's the finished product of both the pizza and the bread.
Happy Eating!
Did you check the King Arthur flour website for pans? They have all kinds of goodies.
ReplyDelete