Showing posts with label recipe review. Show all posts

Wednesday, November 3, 2010

My Top Three Favorite Allergen-Free Holiday Treats

A friend on Facebook brought up the subject of Holiday baking and it made me think I should catch up with this blog by doing a quick post with three of my favorite holiday cookie recipes. I never cared about baking before being diagnosed with multiple food allergies and most of the year I do not do much of it, but Winter in Portland isn't the same without some fresh baked goodies to share. Obviously, if you do not have food allergies or sensitivities, these will be easy to make with regular ingredients.

Happy Eating!

1) Rice Krispie Treats
Easy to do using a butter substitute like Earth Balance Soy-Free Spread and gluten-free crispy rice cereal (there are several good brands, like Erewhon and Nature's Path). Thankfully most marshmallows are okay for me to eat! I make these throughout the year and everyone loves them.

Here's a fun blog post with an easy to follow recipe and visual comparison between the two cereals by "Adventures of a Gluten Free Mom": Gluten Free Rice "Krispie" Treats

2) Ginger Molasses Cookies
My favorite cookie pre-allergies was always Snickerdoodles. Huge cookies with a crackly sugared outside and soft inside, they would make me swoon. I still love Snickerdoodles and the blog that has this and the next recipe has a recipe that is very good here, but these Ginger Molasses Cookies blew my socks off so hard that they're now my favorite cold-weather all-purpose cookie. I love them so much that I don't even want to share with anyone else!

The only substitution I had to make to this recipe was to use powdered egg replacer. The cookies turned out looking almost EXACTLY like the photo and they were so good when eaten warm.

3) German Jam Sandwich Cookies (Hildebrochen)
Another "Beyond the Wheat" cookie recipe (she did 12 different cookie recipes for Christmas last year!) that is astoundingly tasty. This is a little more labor intensive, but the ingredients couldn't be simpler. These were good the day of, but even better the day after. They keep very well and I'm sure would freeze great if you can hold off devouring them long enough to do so! I did half with an all fruit black raspberry seedless jam and half with an all fruit apricot jam and both were very tasty, though the raspberry was my favorite. The glazing of powdered sugar really helped finish these little cookies off, but I only glazed the tops.

I had to substitute both the butter and the eggs in this, but had zero difficulties. The biggest key to success with these cookies is to let the dough chill long enough before rolling it out. Two hours minimum! The first time I made these I did not cut out the center on the top cookie; the second time I did and it made the cookies much prettier. Either way they're very tasty.

Note: I used Pamela's Ultimate Baking & Pancake Mix for my 2009 holiday baking, but I've since decided that I cannot tolerate the powdered buttermilk in this mix, so I'll be trying out other mixes this holiday season. I have a feeling that Bob's Red Mill All Purpose GF Baking Flour will be the most affordable option that also bakes up well and there's the bonus of them being a really awesome local company!

Friday, May 7, 2010

Bread Experiment - FINISHED

This bread experiment is inspired by my new favorite cooking website: Hilah Cooking. Last month Hilah Johnson posted a video with a new way to make bread that she had learned from a 2006 article posted on the New York Times Online. The article is about minimalist bread making and goes into quite a lot of detail in regards to the science behind this method; to boil it all down, instead of kneading the dough time does all the work.

Hilah's recipe and video can be found here and since she uses regular wheat flour, I had to wonder if it would work with gluten-free flour. Creating the perfect loaf of gluten-free flour is one of my main cooking quests, and a lot of other people have asked Hilah if it will work with gluten-free flour; I'm doing a good thing for everyone!

So that's the experiment! Will update with each step:

Step One:
May 7th 9:20 PM

In a large mixing bowl: Mix 1 pkg Pamela's Gluten Free Bread Mix (19 oz bag, 1 loaf) with a heaping 1/4 teaspoon of yeast (included in the bread mix), 1-1/2 tsp salt and 2-1/4 cups warm water in a mixing bowl. Cover loosely with plastic wrap and a damp kitchen towel and set aside.


Step Two:
May 8th 3:20 PM

After a lovely time at the eye doctor's getting fitted for new glasses, we got home just in time for step two of the bread experiment. The only catch? My eyes are completely dilated, so getting nice clear photos was a bit tricky. Also, I punched the dough a bit too hard and hit my knuckles against the bottom of the glass mixing bowl. Ouch!

Here's what you do and this is where not having gluten in the flour really shows up:
  1. Uncover dough; it should have risen quite a lot and if you used plastic wrap, there should be condensation inside...it's a very moist and sticky dough. Next - PUNCH IT! But wait, be gentle, because this dough is softer than gluten dough, so there's very little resistance to your mighty fist and slamming your fist into a glass bowl is a pretty good way to hurt yourself.

  2. Sprinkle flour on a clean surface, like a counter-top or cutting board; turn dough out onto the floured surface, sprinkle liberally with more flour, then as best as you can, fold it over onto itself at least twice. The dough will be EXTREMELY STICKY, so don't be surprised if your hand ends up being covered in dough.

  3. Sprinkle corn meal onto a clean plate or other shallow dish (maybe do this before you get covered in dough) and transfer dough onto the cornmeal. I ended up doing this twice because I changed my mind about which dish to use for step four, so my dough has cornmeal on both sides. Shape as best as you can.

  4. Cover with plastic wrap and towel again and let it rest for two and a half hours.
At this point my expectations are not very high, but I'm still hopeful. Even recipes designed for gluten-free flours end up with dough that really doesn't look like what we think of when we think "bread", so there's a chance that the process will still work despite the ugly dough situation.


Step Three
May 8th 6:30 PM

Two and a half hours later (or there abouts) the dough should be nicely risen. Following the original recipe, I preheated the oven to 450 degrees, placing the only round lidded oven-safe baking dish I have (I really really NEED a cast iron dutch oven) inside to heat up. When the oven was fully heated, I removed the baking dish and put the dough inside it, covered it with the lid and then put it back in the oven to cook for 30 minutes. It's this stage that makes the crust so deliciously crackly, thanks to the steaming action that's occurring within the lidded dish.

At 30 minutes, the lid came off and baked for another 15 minutes. Since this was my first attempt, I tried to follow the instructions are closely as possible, but supposedly you can make a pretty wide range of adjustments and still get a perfect loaf of bread every time.

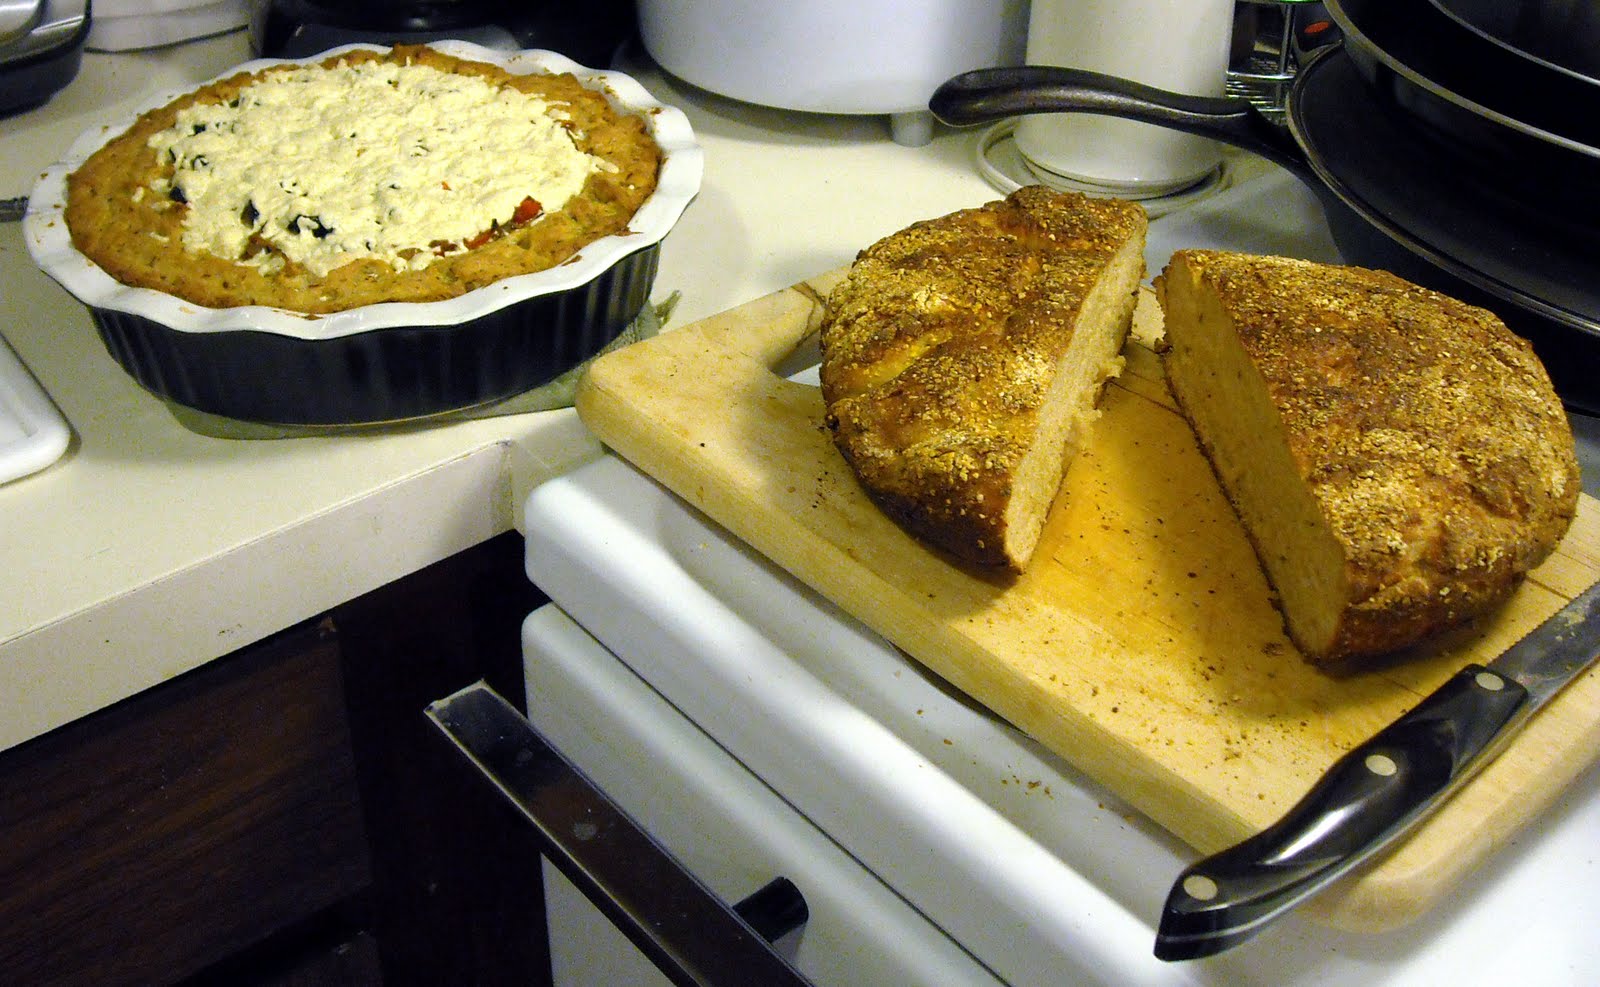
After the forty-five minutes of cooking, out of the oven it came and I promptly turned the entire dish over onto a cutting board to release the bread and...

IT STUCK! It took Garen coming in and using the flexible spatula (he has more height and better leverage for such things) to pry the bread loose. Finally we got it out and it was VERY pretty looking. Nice crackly looking crust, great smell, and it looked quite done.

As with most baked goods, a cooling time is required before cutting, so I let it sit for 15 minutes on the wooden cutting board and then cut it in half; unfortunately it was still a little
sticky in the middle near the bottom. Next time I think I will lower the cooking temperature to 400 and bake it for 45 minutes covered and 15 minutes uncovered to see if that works better.
Garen and I shared a slice out of the middle and despite the sticky part it tasted great! One thing I would love to find is a lidded cast iron loaf pan, since the main reason I make gluten-free bread is to be able to make myself sandwiches during the week for lunch and a round loaf is a bit harder to slice up right for that use.

In summary: Yes, this recipe DOES work for gluten-free flour and the fact that there's zero kneading involved is a huge plus. The dish you cook the bread in really does make the most difference, so choose something heavy with a tight fitting lid. Try cooking the gluten-free version longer on a lower temperature; the gluten-free dough is almost always going to be more dense to start with. If you're not entirely sure that the dough will release easily, a bit of cooking spray or oil should help prevent serious sticking; otherwise use a flexible metal spatula to pry it loose.

Tonight I also made a wonderful gluten-free pizza using Daiya vegan cheese and that recipe will be coming soon! Here's the finished product of both the pizza and the bread.
Happy Eating!

Sunday, April 25, 2010

Hilah's Fish Tacos


My new favorite cooking site is Hilah Cooking. Hilah Johnson is a musician, comedian, actress living in Austin, Texas, and just a few months ago she decided to start up an internet-based cooking show. The videos are hysterically funny, the recipes are easy and so far all the ones I've tried have turned out great.

While at the grocery store today, we bought a big bag of frozen tilapia filets (we've been trying to eat more fish) and Garen and I looked at each other and said, "Hilah's Fish Tacos!" We had watched that episode the other night together and laughed ourselves silly, but more importantly they looked scrumptious. So then we had to buy all the stuff for the "toppins'", which is basically gussied up coleslaw, along with some other toppings like tomato and avocado. I love making all the people in the Fred Meyer's self-service checkout line glare in ire when we have lots of produce to manually punch in to the kiosk!

The preparation was pretty straightforward and would have been easier if the sink hadn't had dirty dishes in it or the dishwasher had been emptied or the cast iron skillet had been cleaned, but once I got all the counters cleared off and things rolling, it went pretty quickly.

Here's the link to the video and recipe: http://hilahcooking.com/fish-tacos/

And seriously O. M. G. The video made these look good enough to try, but they REALLY exceeded my expectations and the bonus awesome thing (from my point of view at least) is that it's super easy to adapt for those of us with weird food issues like allergies or intolerances.

Changes I made:
  1. I didn't have anise seed, so I left that out and added a little authentic Hungarian paprika instead (my dad picked up a huge 8 oz bag of REAL paprika during his last trip to Hungary and it is AWESOME).
  2. I can't have mayo, so I split the toppin' into two bowls, one with mayo (for the man & boy) and one with an egg and dairy-free creamy poppyseed dressing for myself. I love this dressing so much: http://www.briannassaladdressing.com/flavors/poppy-seed.html
  3. I also left out the jalapeƱo, cause I DON'T like it spicy (neither does the 9 year old, who ate seconds) and I used sweet onion.
  4. We sliced up avocado and tomatoes, added a bit of salsa and served it up with corn on the cob.
For the first time ever I used Hilah's method of heating up corn tortillas by placing them directly on the cooking element on the stove-top; Garen said, while we were watching the video, that his mom used to do the exact same thing and it looked like it worked, so I figured why not! It worked like a charm with the heat at medium, though I used tongs to turn them, since I am so prone to burning myself.

I really can't think of any other changes I would make to this recipe and we will definitely be making this again and frequently.

Happy Eating!